
If you encounter any issues with the Free Shipping Label plugin, this section will help you identify and resolve common problems.
Find your problem in the list below and follow its steps in order. Most problems come from a shipping setting, and the Free shipping status finds many of them for you, so start there.
- Start with the Free shipping status
- The bar doesn’t show at all
- The bar shows only after an address is entered
- The bar shows the wrong amount
- The bar disappears when free shipping is reached
- The bar shows on some pages but not others
- Block Cart and Checkout
- The bar doesn’t update when the cart changes
- Other shipping methods disappear
- The Product Label doesn’t show
- The free gift isn’t added to the cart
- Texts show in the wrong language, or don’t show
- Still stuck?
Start with the Free shipping status
Where: WooCommerce → Free Shipping Label → Free Shipping.
The Free shipping status at the top of the tab reads your WooCommerce shipping settings and shows the amount the bar uses in each shipping zone. It never changes your settings.
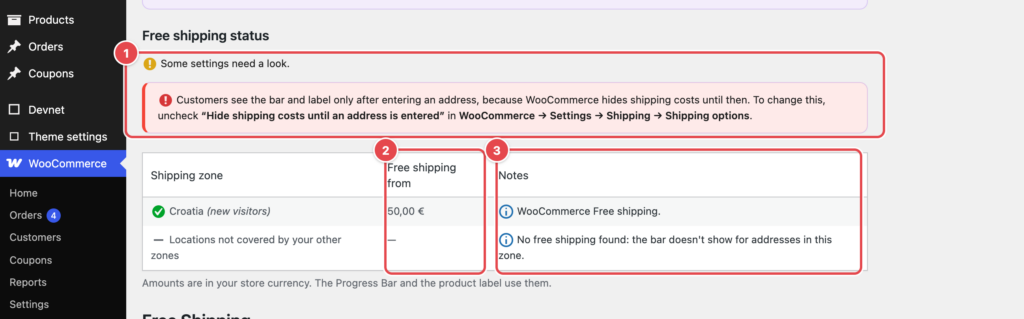
- Read the summary (1). “Everything looks fine.” means the bar has an amount to count down to. “Some settings need a look.” comes with an alert that names the setting to change.
- Find your customers’ zone and look at Free shipping from (2). A dash (—) means the bar doesn’t show for addresses in that zone.
- Read the Notes (3). They say where the amount comes from, or why there’s none.
| The note says | What to do |
|---|---|
| No free shipping found | Add a Free shipping method with a minimum order amount to the zone (WooCommerce → Settings → Shipping), or set a custom threshold. |
| Free shipping here has no minimum order amount, or requires nothing | Open the zone’s Free shipping method and set Free shipping requires… to A minimum order amount. |
| Free shipping here needs a coupon only | The bar shows only once a free shipping coupon is applied. For a bar from the first product, choose a minimum order amount. |
| Shipping is disabled in WooCommerce | In WooCommerce → Settings → General → Shipping location(s), choose any option except Disable shipping & shipping calculations. |
Tip: Fix what the status points out first. The bar uses the same settings, so once the status says “Everything looks fine.”, most problems are gone.
The bar doesn’t show at all
Where: WooCommerce → Free Shipping Label → Progress Bar.
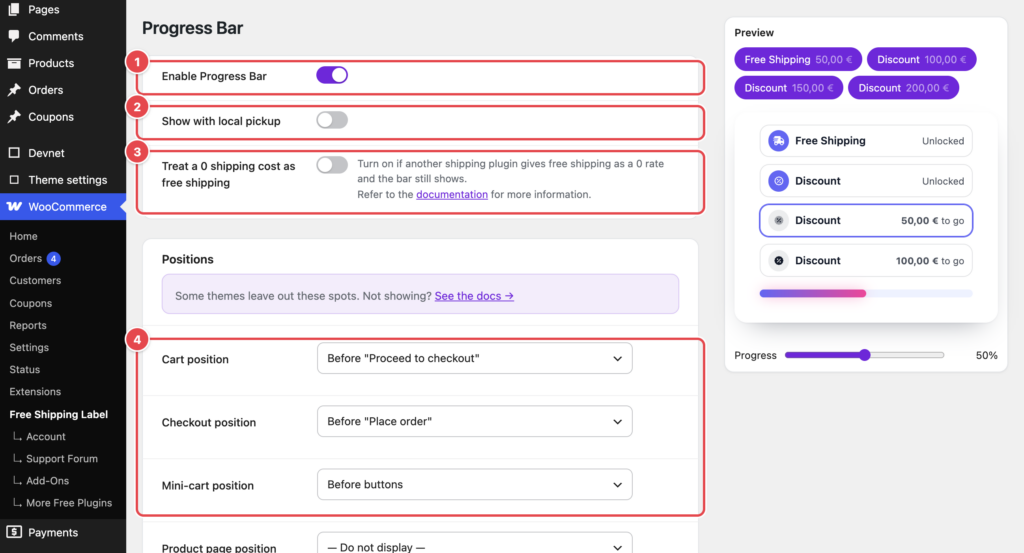
Check these in order:
- Enable Progress Bar (1) is on, and you saved the settings.
- The page has a position (4): Cart position, Checkout position or Mini-cart position isn’t — Do not display —.
- The cart holds a product that needs shipping. The bar hides when the cart is empty or holds only virtual products.
- The customer hasn’t chosen Local pickup. The bar hides with Local pickup, unless Show with local pickup (2) is on.
- Logged-in users only is off (Free Shipping tab → Visibility). When it’s on, guests don’t see the bar.
- The Free shipping status shows an amount for the customer’s zone.
Still nothing? If your Cart or Checkout uses blocks, see Block Cart and Checkout. If the bar shows on some pages only, see The bar shows on some pages but not others.
Note: Shipping is already free, but the bar still asks for more? Another shipping plugin gives free shipping as a rate that costs 0. Turn on Treat a 0 shipping cost as free shipping (3).
Tip: Test as a customer: open your store in a private browser window, add a product to the cart and open the cart page.
The bar shows only after an address is entered
Two settings make the bar wait for an address.
WooCommerce hides shipping costs until there’s an address
While Hide shipping costs until an address is entered is checked, WooCommerce shows no shipping costs before an address, so the bar and the Product Label wait too. The Free shipping status shows an alert about it.
- Go to WooCommerce → Settings → Shipping → Shipping settings.
- Uncheck Hide shipping costs until an address is entered (1).
- Save.

Note: Older WooCommerce versions call this section Shipping options.
The initial shipping zone
Before customers enter an address, the bar uses the amount of the Initial shipping zone (1) (Free Shipping tab → Threshold). With — None —, the bar waits for an address. Choose the zone most of your customers are in.
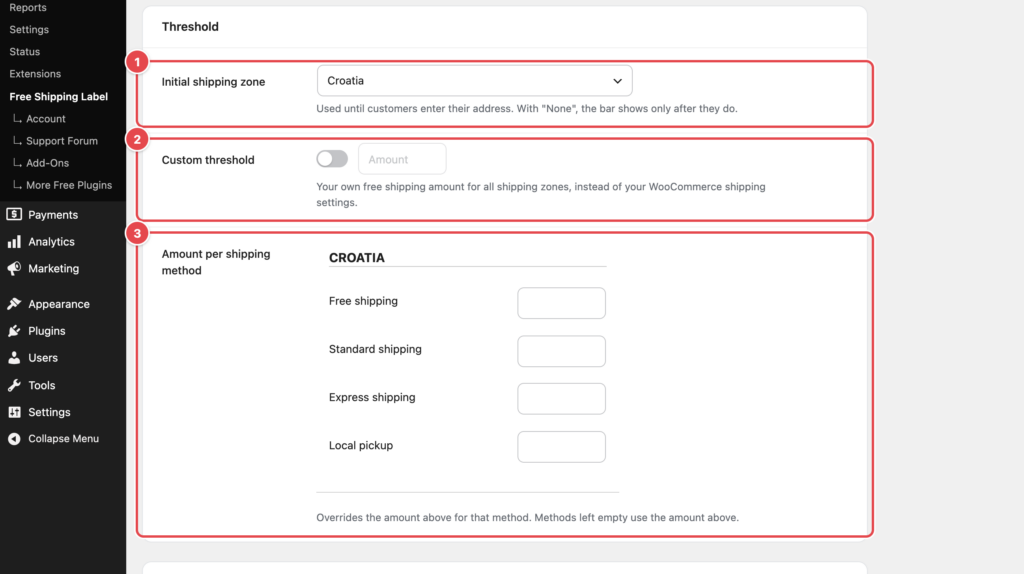
Once the customer enters an address, the bar switches to that address’s zone.
Note: WooCommerce can locate new visitors itself (WooCommerce → Settings → General → Default customer location). The bar then starts with the visitor’s zone, and the initial shipping zone has no effect. The Free shipping status tells you when that’s the case.
The bar shows the wrong amount
The bar counts down to the free shipping amount of the customer’s shipping zone. Check:
- The zone. Before an address is entered, the bar uses the initial shipping zone. After that, it uses the zone of the customer’s address, which can have another amount. The Free shipping status lists both.
- Another shipping plugin. The bar reads free shipping amounts from WooCommerce’s Free shipping method and from Flexible Shipping, WooCommerce Advanced Free Shipping and GLS Shipping for WooCommerce. Pro adds EuroParcel. With any other shipping plugin, turn on Custom threshold (2) (screenshot above) and enter your free shipping amount.
- An amount per shipping method (Pro). Enter it in Amount per shipping method (3). Methods left empty use the custom threshold.
- Several currencies (Pro). Pro converts the amount for FOX (formerly WOOCS), CURCY, WooPayments multi-currency and WooCommerce Multilingual (WPML). With other currency switchers, the amount isn’t converted.
The bar disappears when free shipping is reached
Once the cart qualifies, Message when the goal is reached takes the place of the bar.
Where: Progress Bar → After free shipping is reached.

- Nothing shows at all? The message’s switch (1) is off. Turn it on.
- To keep a full bar under the message, turn on Show full progress bar (2) (Pro).
The bar shows on some pages but not others
The bar is added through WooCommerce hooks: fixed spots in WooCommerce’s cart, checkout and mini-cart templates. Some themes and side cart plugins replace these templates and leave a hook out, so the bar has nowhere to show on that page.
| Default position | WooCommerce hook |
|---|---|
| Cart: Before “Proceed to checkout” | woocommerce_proceed_to_checkout |
| Checkout: Before “Place order” | woocommerce_review_order_before_submit |
| Mini-cart: Before buttons | woocommerce_widget_shopping_cart_before_buttons |
- In Pro, choose another position for that page. Each page has several positions, and the product page has its own.
- In Pro, place the bar yourself with the
[fsl-progress-bar]shortcode or the Progress Bar block. - Using FunnelKit Cart, WPC Fly Cart or Xootix Side Cart? Pro lists their positions in Mini-cart position.
- Ask your theme’s developer to add the missing hook. The Developer Guide explains the hooks.
Block Cart and Checkout
WooCommerce builds the Cart and Checkout pages in one of two ways: the classic pages with a shortcode, or the newer pages built with blocks. The bar works differently on each.
To see which one you use, go to Pages and edit your Cart or Checkout page:
- A
[woocommerce_cart]or[woocommerce_checkout]shortcode means the classic page. - A Cart or Checkout block means the block page.


The settings page tells you too: when your Cart or Checkout uses blocks, the free version shows a notice above the positions.
- Free version: the bar works on the classic Cart and Checkout. To use it, replace the Cart block with a Shortcode block that holds
[woocommerce_cart], and the Checkout block with[woocommerce_checkout]. - Pro: the position lists start with block positions, and the bar is placed in the block Cart, Checkout and Mini-Cart for you. You can also add the Progress Bar block yourself; see Adding the Progress Bar Block.
Note: In Pro, a warning under the position tells you when the chosen block isn’t on your page, or when you’ve also added the Progress Bar block there (the bar would show twice).
The bar doesn’t update when the cart changes
The bar refreshes with WooCommerce’s own cart updates. Anything that blocks those updates blocks the bar too.
- Reload the page. If the amount is right after a reload, the plugin works and something blocks the live update.
- Page cache. Exclude the Cart and Checkout pages from page caching. Most cache plugins do this by default.
- Script optimization. If your cache or optimization plugin delays or combines JavaScript, add
free-shipping-labelto its exclusions. - Cart fragments. Keep WooCommerce’s cart fragments on. Some optimization plugins have a setting that turns them off, and then the mini-cart and the bar in it stop updating.
- Side carts and custom themes. A side cart that changes the cart its own way doesn’t send WooCommerce’s events. Pro supports FunnelKit Cart, WPC Fly Cart and Xootix Side Cart.
Other shipping methods disappear
Two settings hide the other shipping methods once free shipping applies.
- When free shipping is available (1) on the Free Shipping tab. Show only free shipping and Show only free shipping and local pickup hide the rest. Choose Show all shipping methods to keep them.
- WooCommerce’s own Hide shipping rates when free shipping is available, in WooCommerce → Settings → Shipping → Shipping settings, under the address setting above.
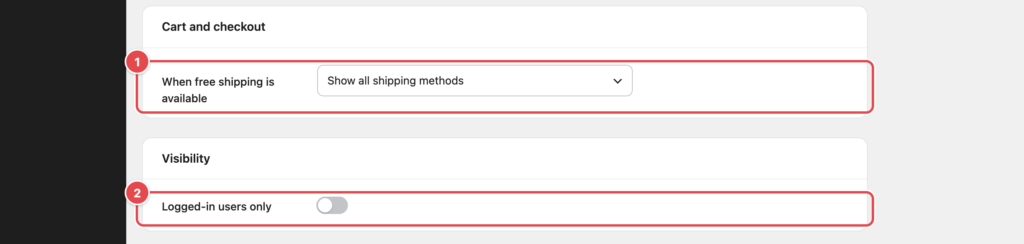
Logged-in users only (2) is on the same tab: when it’s on, guests don’t see the bar.
The Product Label doesn’t show
The label shows next to the price of products that get free shipping on their own: the product’s price reaches the free shipping amount.
Where: WooCommerce → Free Shipping Label → Product Label.
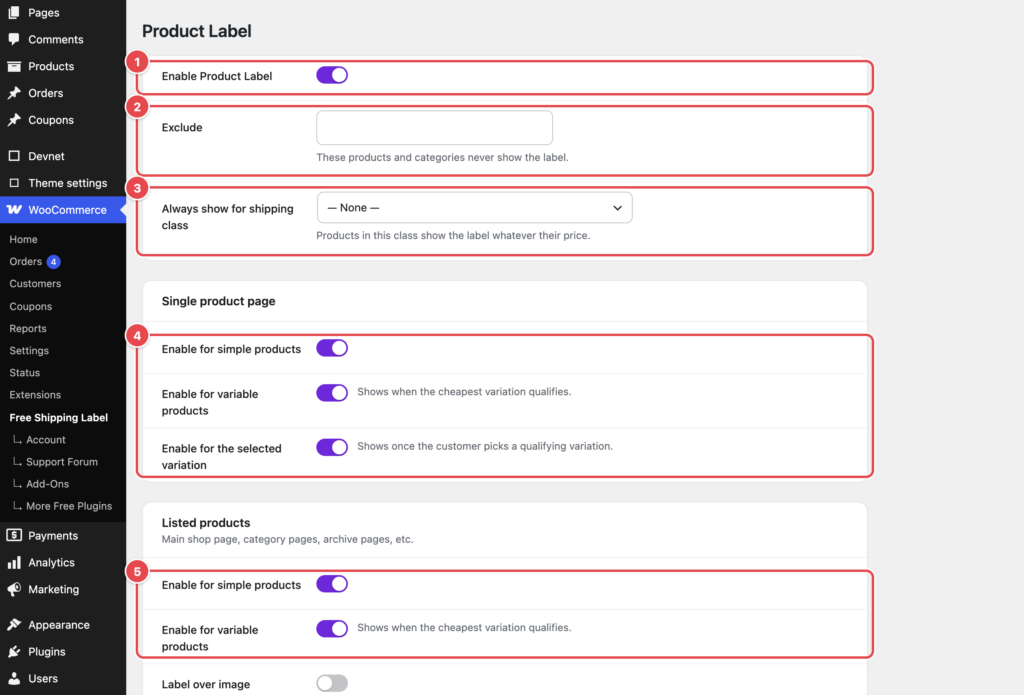
- Enable Product Label (1) is on.
- The product’s price reaches the free shipping amount of the customer’s zone (before an address, the initial shipping zone). A variable product shows the label when its cheapest variation qualifies.
- The product needs shipping. Virtual and downloadable products don’t show the label.
- The label is on for that page and product type: Single product page (4) and Listed products (5).
- The product isn’t in Exclude (2) (Pro).
To show the label whatever the price, give the products a shipping class and choose it in Always show for shipping class (3) (Pro).
Note: The label is added to the price WooCommerce shows. A theme or page builder that prints the price its own way doesn’t show it.
The free gift isn’t added to the cart
In the free version, the Gift Bar shows the gift as a goal in the bar. Choosing the gift product and adding it to the cart are Pro: in the free version, When the gift is unlocked offers only Do nothing.
Where: WooCommerce → Free Shipping Label → Gift Bar.
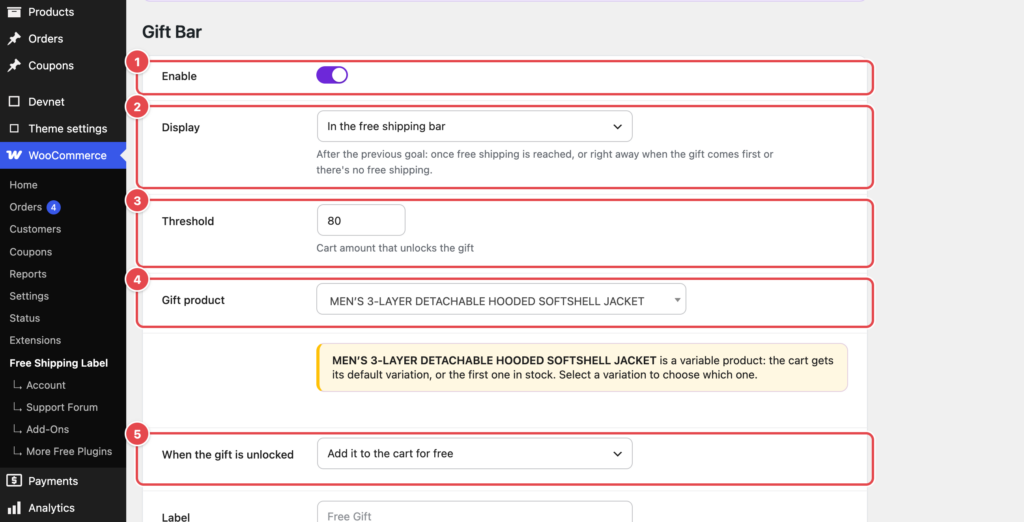
In Pro, check:
- Enable (1) is on.
- Threshold (3) has an amount. 0 gives the gift with every order; an empty field turns the gift off.
- Gift product (4) is set, in stock and has a price. WooCommerce can’t add a product without a price, even for free; the cart shows the gift as free anyway. For a variable product, the cart gets its default variation, or the first one in stock.
- When the gift is unlocked (5) is Add it to the cart for free.
- The cart reaches the threshold. The gift leaves the cart when the cart drops below it again.
Note: The gift goal shows up according to Display (2). With After the previous goal is reached, it appears once free shipping is reached, or right away when the gift comes first or there’s no free shipping.
Texts show in the wrong language, or don’t show
Where: Progress Bar → Text (each bar has its own texts).
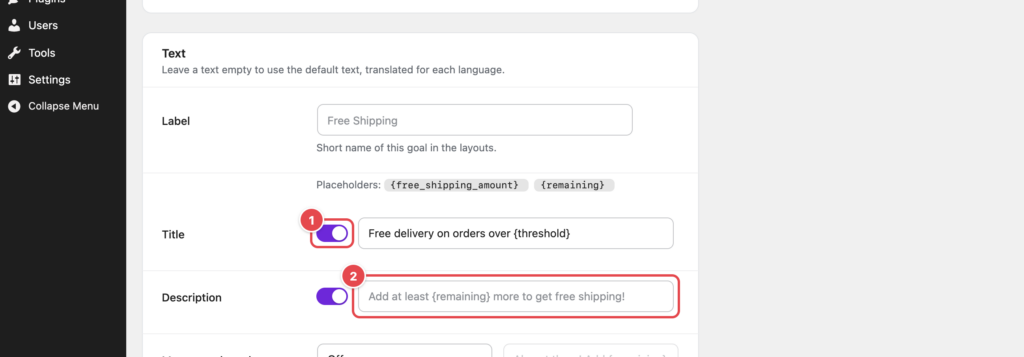
- The switch next to a text (1) shows or hides it. Turn it on to show the text. Your wording stays saved while it’s off.
- An empty field shows the default text in your customer’s language. The field shows that default as a grey hint (2).
- A text you type shows as typed, in every language. On a multilingual store, leave the field empty to show the translated default.
Note: Updated from 3.5? Texts you had emptied to hide them now have their switch off. The Multilingual setting is gone: empty fields show the translated defaults instead.
Still stuck?
Send us:
- a screenshot of the Free shipping status,
- a link to the page where the bar should show,
- your theme, and your shipping, cache and cart plugins.
Free version: ask in the Support Forum (also under WooCommerce → Free Shipping Label → Support Forum).
Pro: use Contact Us under WooCommerce → Free Shipping Label.