When it comes to setting up a local WordPress development environment, there are countless options. If you’re building simple websites, you can install one of the many all-in-one tools and get up and running quickly. But over the years, as I needed more control over specific parts of my stack. I eventually opted for Laravel Homestead, a pre-packaged Vagrant box that provides a consistent development environment. Homestead, running inside VirtualBox, gave me full control over the stack, including different PHP versions, databases, and server configurations, making it ideal for more complex development needs.
This setup worked beautifully for my needs until I hit a roadblock when I switched from an Intel-based Mac to one with an Apple Silicon chip. Long story short, VirtualBox doesn’t play well with Apple’s arm64 architecture. Sure, there are workarounds, but that was a dealbreaker for me.
So, I started looking for an alternative. That’s when I stumbled upon Laravel Herd. Herd offers an incredibly simple way to set up a local WordPress development environment. It comes in both free and paid versions, but since I’m using the free version, I had to set up a few additional things myself. Thankfully, it’s super easy to get everything up and running in just a few minutes.
This guide is based on setting up a local WordPress development environment on macOS. However, the process for Windows users is very similar, as all of the tools mentioned (Laravel Herd, DBngin, TablePlus, and Mailpit) are also supported on Windows with only minor differences in installation and setup.
We’ll also need a few other tools:
- DBngin: a lightweight MySQL database server.
- TablePlus: a sleek database management tool (similar to phpMyAdmin).
- Mailpit: a fantastic little tool for testing emails during development.
With these tools, you can create a powerful local WordPress development environment that runs fast—even on heavy sites. Plus, it won’t gobble up all your CPU and memory while you work, which is a big win.
Table of Contents
My Workflow and Setup
I’ve been developing WordPress plugins and themes for over a decade. To keep things organized, I like to have everything in one place, and I structure my workspace like this:
- WORK
	—- PLUGINS // Contains all of my plugins
	—- THEMES  // Contains all of my themes
	—- WWW     // Contains all local WordPress sites
  	-- ...     // Other development related folders.
This way, I can share the same plugins and themes across multiple local sites. It keeps things tidy, and I can work on projects without having to duplicate files across different sites.
Step 1: Installing Laravel Herd
Let’s start by setting up Laravel Herd. Head to their website, download the installer, and run it on your machine. For more details, you can check out the Laravel Herd documentation.
Once installed, Herd comes with a few PHP versions preinstalled, but you can easily add more. You can find these options in the settings.
Here’s a quick guide to get started:
General Settings
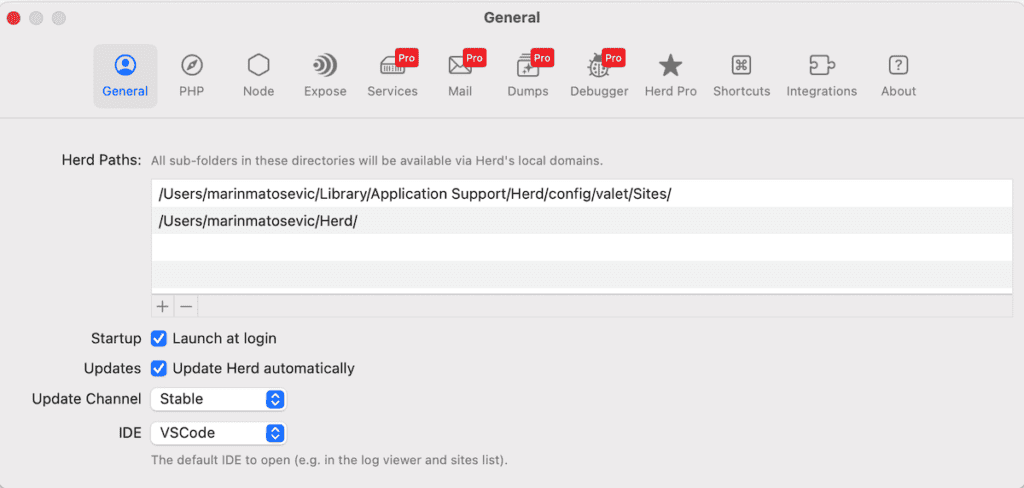
Copy the path to the Herd directory. Mine is: /Users/marinmatosevic/Herd/
Keep this handy—we’ll need it later.
Optionally, set your IDE and enable auto-start and updates.
PHP Settings
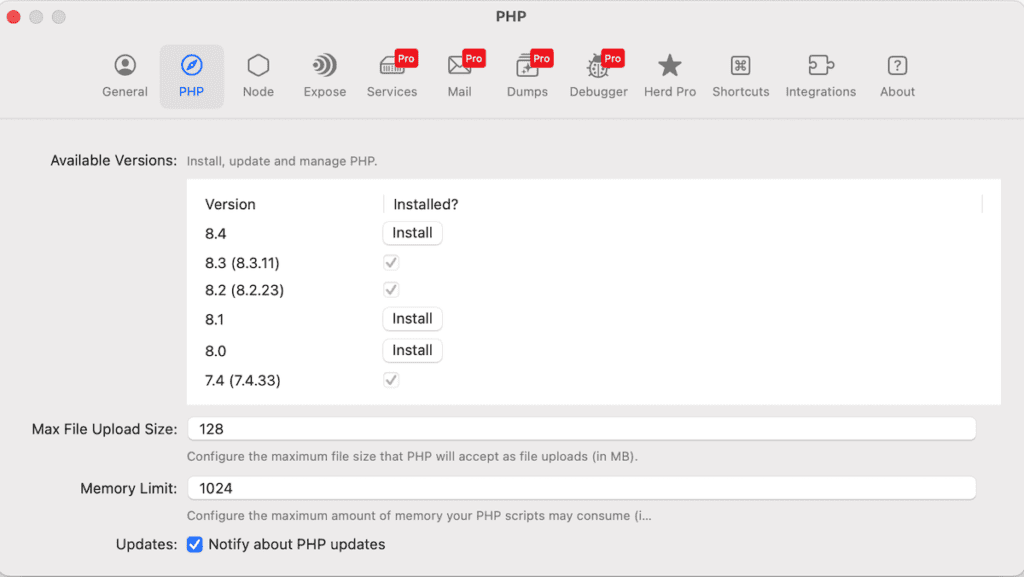
Install any additional PHP versions you need.
Customize the max file upload size and memory limit based on your preferences.
If you installed a PHP version that isn’t the default, you can switch to it by selecting it from the top menu.
And that’s it for Herd setup!
Step 2: Setting Up the Database with DBngin
Next, we’ll need a MySQL database. Since Herd doesn’t come with one by default, we’ll use DBngin. This lightweight tool is perfect for setting up databases in your local WordPress development environment without the bulk of a full database server.
- Go to DBngin’s website, download the installer, and run it.
- Launch the app and set up a MySQL service. By default, it will be available on
localhost:3306, with the usernamerootand no password.
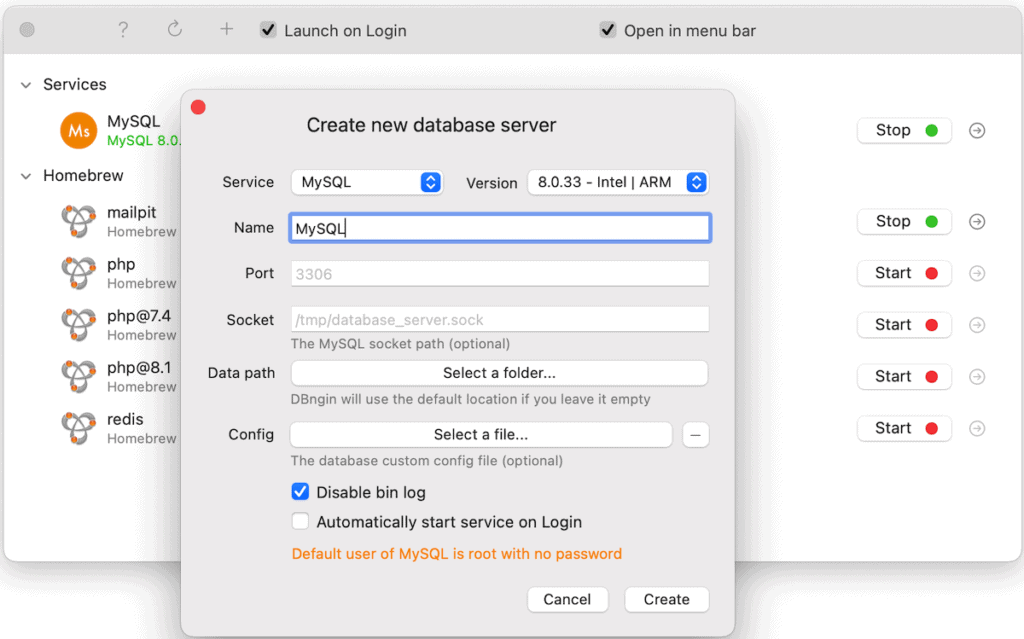
DBngin is super simple to configure and works seamlessly with TablePlus.
Step 3: Managing Databases with TablePlus
TablePlus is a modern, user-friendly database management tool, and since it’s built by the same team behind DBngin, it integrates perfectly. You can explore the full features in the TablePlus documentation.
- Download and install TablePlus from their site.
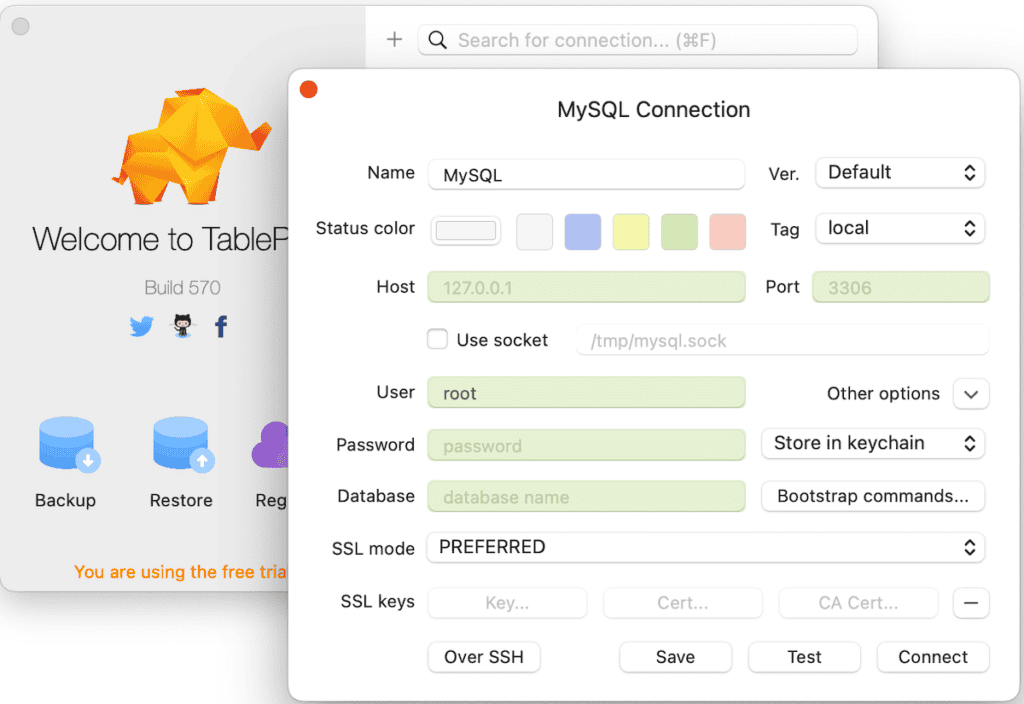
- Open the app, click the “+” icon, and add a new MySQL connection.
- Set your connection name and user (
root), and click the “Test” button. If everything is set up correctly, the fields will turn green. - Click “Connect,” and you’re good to go!
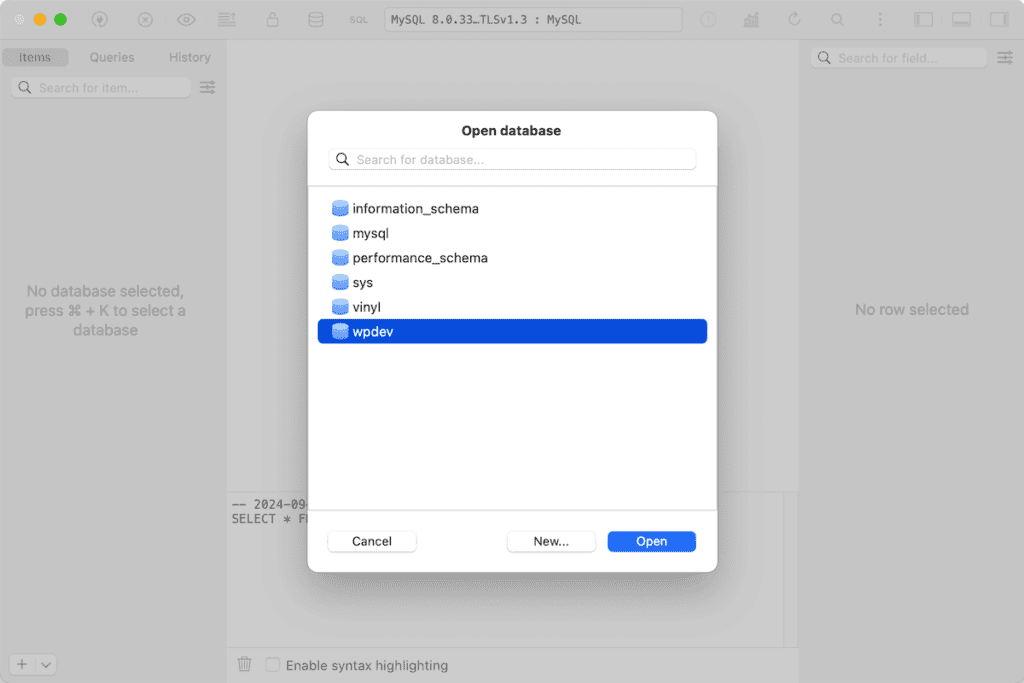
Now, let’s add a database for our WordPress installation:
- Click the database icon and select “New”.
- Set the database name (e.g.,
wpdev) and hit OK. - Now you can open the database and start managing it through TablePlus.
That’s basically it! With these steps, we’ve set up a LEMP stack, which stands for Linux, Nginx, MySQL, and PHP. This stack provides a powerful and efficient foundation for your local WordPress development environment.
Step 4: Creating Local Sites with Laravel Herd
Herd uses the .test domain for local WordPress development sites. If you head to your ~/Herd directory (mine is /Users/marinmatosevic/Herd/), any folder you create there will be treated as a new site. For example, if you create a folder called mysite, your new local site will be available at http://mysite.test.
Since I like to keep my projects organized, I’ll go into my WORK directory and create a new folder inside WWW for my site. In this case, let’s use wpdev as the folder name.
Now, let’s link that folder to Herd using a symlink. Open up Terminal and run this command:
ln -s ~/Documents/WORK/WWW/wpdev ~/Herd/wpdev
You can do the same for plugins. Here’s how to link a plugin from your PLUGINS folder into your WordPress installation:
ln -s ~/Documents/WORK/PLUGINS/my-plugin ~/Documents/WORK/WWW/wpdev/wp-content/plugins/my-plugin
Now you can work on the plugin directly from the plugins directory, and it’ll be reflected across all your local sites that use it. Pretty handy, right? 🙂
Step 5: Setting Up HTTPS
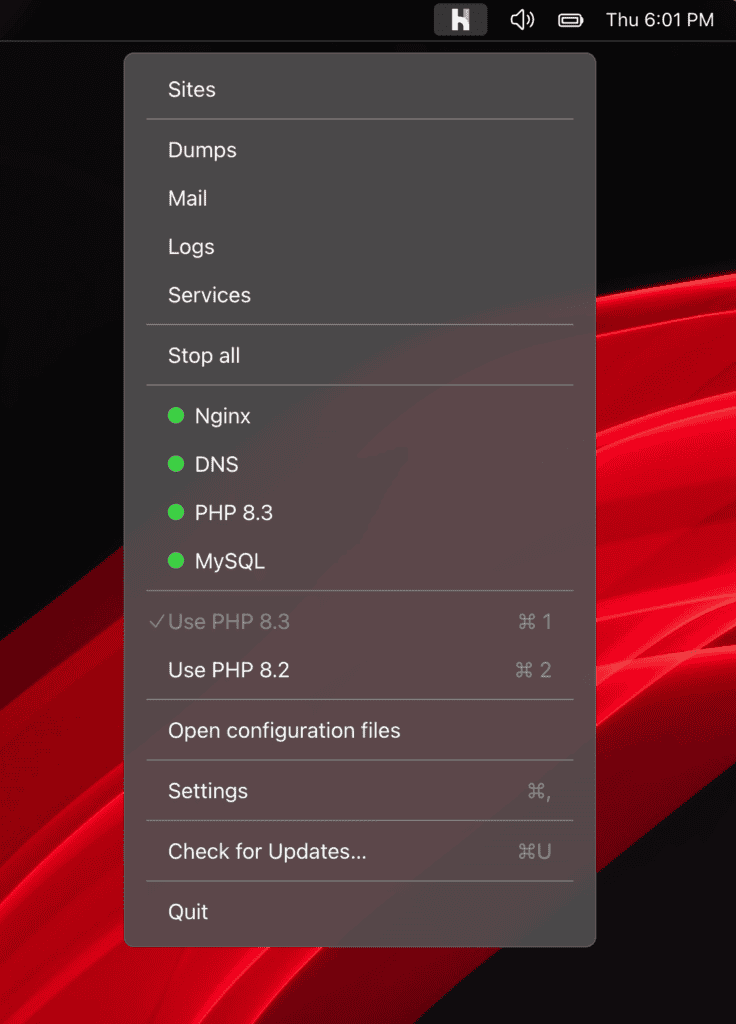
By default, Herd serves sites over http, but setting up https is easy. From the Herd menu:
- Choose “Sites.”
- Select your site and click the lock icon to secure it. Done!

Step 6: WordPress Database Connection
In your wp-config.php file, set the database credentials as follows:
define('DB_NAME', 'wpdev');
define('DB_USER', 'root');
define('DB_PASSWORD', '');
define('DB_HOST', '127.0.0.1:3306');
If you have trouble connecting to the database, try using localhost:3306 instead of 127.0.0.1:3306
Debugging with debug.log
If you find that your debug.log isn’t logging messages, it’s likely due to Herd’s error_log path being different from the WordPress default. A simple way to resolve this is by creating a symlink that redirects the log path correctly.
Add the following code snippet to your wp-config.php file:
define('WP_DEBUG', true);
define('WP_DEBUG_LOG', true);
define('WP_DEBUG_DISPLAY', false);


// Target file or directory
$target = ini_get('error_log');

// Symlink path
$link =  __DIR__ . '/wp-content/debug.log';

if (! is_link($link) && file_exists($link)) {
	unlink($link);
}

// Check if the symlink already exists
if (! (file_exists($link) || is_link($link))) {
	symlink($target, $link);
}
This code creates a symbolic link from the error_log to your WordPress debug.log. It ensures that any errors logged by Herd are properly routed to your wp-content/debug.log file, so you can see them as expected.
For more detailed information, you can refer to this article.
Step 7: Setting Up Mailpit for Email Testing
Mailpit is a great tool for testing emails in your local environment. For more details, visit the Mailpit documentation.
To install it on a Mac, use Homebrew:
brew install mailpit
Then, to run Mailpit automatically in the background:
brew services start mailpit
Next, configure PHP to use Mailpit for sending emails. Open your php.ini file (found in Herd’s PHP version directory) and add this line:
sendmail_path = '/opt/homebrew/bin/mailpit sendmail'
If you’re on an Intel Mac, the path will be:
sendmail_path = /usr/local/bin/mailpit sendmail
Restart Herd, and you can access Mailpit’s interface at http://localhost:8025.
Bonus: Install WP-CLI
WP-CLI is an incredibly useful command-line tool for managing all aspects of WordPress. Whether you’re updating plugins, installing themes, or handling databases, WP-CLI makes these processes faster and more efficient. Here’s how to install it:
Download WP-CLI
First, we need to download the WP-CLI phar file. Open up your terminal and run the following command:
curl -O https://raw.githubusercontent.com/wp-cli/builds/gh-pages/phar/wp-cli.phar
Make the File Executable
Now, we need to make the wp-cli.phar file executable. Run this command to change its permissions:
chmod +x wp-cli.phar
This allows your system to run the file as a program.
Move WP-CLI to a Global Directory
To make WP-CLI available system-wide (so you can use the wp command from anywhere), move the wp-cli.phar file to a global directory like /usr/local/bin/:
sudo mv wp-cli.phar /usr/local/bin/wp
By doing this, you’ll be able to run WP-CLI using the wp command, no matter which directory you’re in.
Test the Installation
Finally, to make sure everything is set up correctly, run:
wp --info
This will display information about your WP-CLI installation, confirming that it’s ready to use.
Conclusion
Congrats! 🎉 You’ve now set up a fast, lightweight local WordPress development environment on your Mac. With Laravel Herd, DBngin, TablePlus, and Mailpit, you have a streamlined, efficient toolkit for building, testing, and refining your plugins, themes, and even full WordPress sites—completely locally, without the unnecessary bloat.
Whether you’re focusing on plugin development, theme customization, or complete site builds, this environment gives you the flexibility and speed to iterate quickly. By investing time in setting up this robust local WordPress environment, you’re positioning yourself to work more efficiently and creatively in your WordPress projects.
Once your local stack is ready, you can start experimenting with AJAX in WordPress — our guide on REST API vs admin‑ajax.php walks you through both approaches.
Now it’s time to dive into your next project—happy coding! 🙂