Free shipping is no longer a “nice bonus” in ecommerce — it’s an expectation. Study after study shows that customers are far more likely to complete a purchase when free shipping is within reach. The problem? Simply offering free shipping isn’t enough to influence behavior.
Most WooCommerce stores set a free shipping threshold and hope customers will notice it. In reality, many shoppers abandon their carts because they don’t realize they’re just a few dollars away from qualifying.
That’s where a free shipping bar comes in.
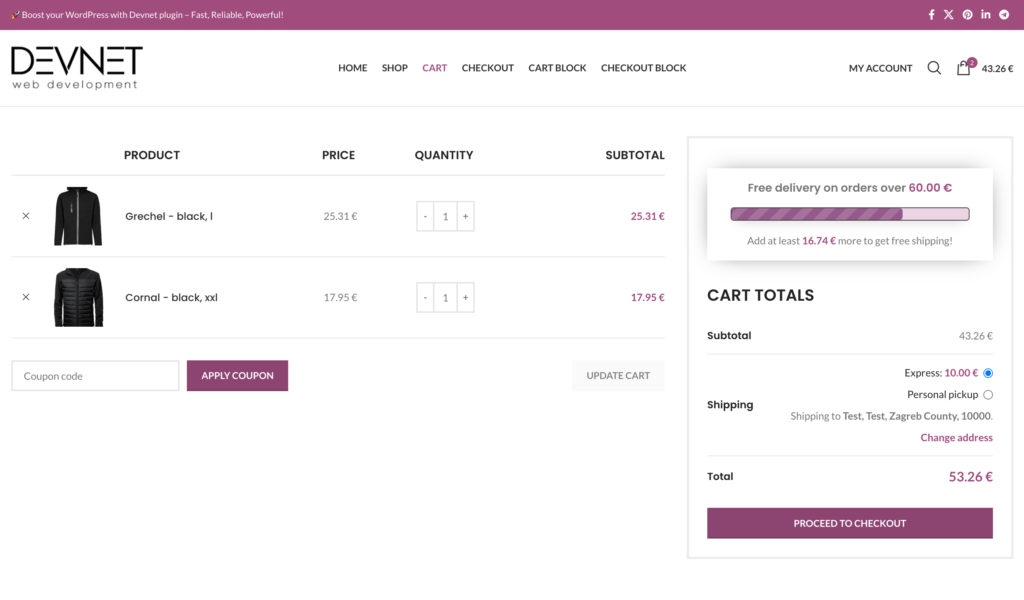
A dynamic progress bar shows customers exactly how much more they need to spend to unlock free shipping — turning hesitation into motivation and increasing average order value at the same time.
In this guide, you’ll learn how to add a free shipping progress bar to WooCommerce, how it works behind the scenes, and how to use it strategically to maximize conversions — not just display a message.
Why You Need a Free Shipping Bar in WooCommerce

Free shipping works because it shifts the customer’s focus from price to goal completion.
When shoppers see a product for €42 and the free shipping threshold is €50, their brain doesn’t process it as “I need to spend €8 more.” It processes it as:
I’m almost there…
That psychological shift is powerful.
A static message like “Free shipping on orders over €50” doesn’t create urgency. It doesn’t create momentum. It’s passive.
A dynamic free shipping bar, on the other hand:
- Updates automatically as products are added to the cart
- Shows the exact remaining amount needed
- Reinforces progress visually
- Encourages adding one more item instead of abandoning the cart
This turns free shipping from a policy into a conversion tool.
The Real Impact on Average Order Value
When implemented correctly, a free shipping progress bar can:
- Increase average order value (AOV)
- Reduce cart abandonment
- Improve perceived value
- Encourage cross-sells and impulse add-ons
Instead of discounting products (which reduces margins), you’re guiding customers toward spending more voluntarily.
And that’s a much healthier growth strategy.
Now let’s look at the different ways you can add a free shipping bar to WooCommerce — from manual code solutions to plugin-based setups.
Method 1: Adding a Free Shipping Bar with Custom Code
Technically, you can build a free shipping message in WooCommerce using custom PHP and JavaScript.
At a basic level, you would need to:
- Retrieve the cart subtotal
- Detect the active shipping zone and free shipping threshold
- Calculate the remaining amount
- Output a dynamic message above the cart or product page
- Refresh the message via AJAX when the cart updates
Here’s a simplified example of what that logic might look like:
add_action( 'woocommerce_before_cart', function() {

    $threshold = 50; // Free shipping threshold
    $subtotal  = WC()->cart->get_subtotal();

    if ( $subtotal < $threshold ) {
        $remaining = $threshold - $subtotal;
        echo '<div class="free-shipping-message">';
        echo 'Add ' . wc_price( $remaining ) . ' more to get free shipping!';
        echo '</div>';
    } else {
        echo '<div class="free-shipping-message success">';
        echo 'You’ve unlocked free shipping!';
        echo '</div>';
    }
});
This works — but only at a very basic level.
The Limitations of Custom Code
A real-world WooCommerce store usually requires more than this:
- Different shipping thresholds per country
- Support for tax-inclusive or tax-exclusive subtotals
- Compatibility with AJAX cart updates
- Display in the mini cart
- Mobile-friendly styling
- Custom messages before and after the threshold
Handling all of that manually quickly becomes complex — especially if you want it to stay compatible with future WooCommerce updates.
For simple stores, custom code may be enough.
But for scalable, conversion-focused implementations, a more flexible solution is usually better.
Let’s look at how to add a free shipping bar using a plugin-based approach.
Method 2: Adding a Free Shipping Bar Using a Plugin (Step-by-Step Example)

While you can build a custom solution, most WooCommerce stores benefit from using a dedicated plugin that handles dynamic updates, shipping zones, and edge cases automatically.
In this example, we’ll use the Free Shipping Label plugin to demonstrate the setup process. The same general principles apply to other progress bar plugins, but we’ll focus on a real configuration so you can follow along.
Step 1: Install Free Shipping Label
- Go to Plugins → Add New
- Search for Free Shipping Label
- Install and activate the plugin
After activation, you’ll find the settings panel under:
WooCommerce → Free Shipping Label
You can also review the official setup guide here.
Step 2: Match Your WooCommerce Free Shipping Settings
Before configuring the bar, make sure your shipping method is properly set up:
WooCommerce → Settings → Shipping → Shipping Zones
- Add or edit a Free Shipping method
- Define the minimum order amount
- Confirm whether coupons affect eligibility
The progress bar should reflect the exact same threshold.
Detailed documentation for this step.
Step 3: Configure the Dynamic Messages
Inside Free Shipping Label settings, you can define:
- Message before reaching the threshold
- Success message after unlocking free shipping
- Dynamic remaining amount placeholder
Example:
Before threshold: “Add {remaining} more to get free shipping”
After threshold: “You’ve unlocked free shipping!”
You can also customize styling, colors, and placement.
More advanced configuration options are explained here.
Step 4: Choose the Right Placement
Where you display the bar matters.
Common high-performing placements:
- Above the cart totals
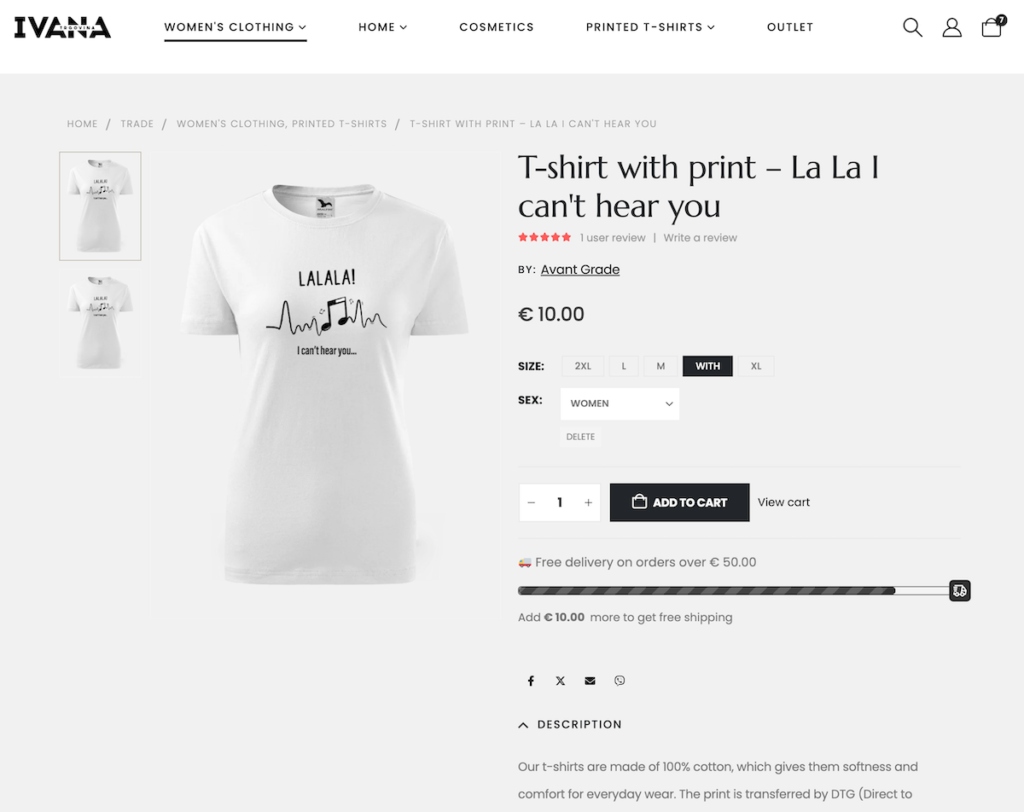
- On the product page
- Inside the mini cart
- At the top of the page (sticky bar)
Cart and mini cart placements often perform best because they appear at decision points.
Testing placement can significantly impact results.
At this point, you have a working free shipping bar.
But adding it is just the beginning.
To truly increase average order value, you need to optimize how it’s configured and displayed.
Let’s look at some advanced optimization strategies next.
Advanced Optimization Strategies for Maximum Impact
Adding a free shipping bar is easy.
Making it actually increase revenue requires strategy.
Here are the optimizations that make the real difference.
1. Set a Smart Threshold (Not a Random One)
Many stores choose a free shipping threshold arbitrarily.
A better approach:
- Look at your current average order value (AOV)
- Set the threshold 10–20% above it
Example:
If your average order value is €42,
set free shipping at €50 or €55.
Too low → no AOV increase.
Too high → customers ignore it.
The sweet spot feels achievable.
2. Use Clear, Motivating Messaging
Keep your message simple and goal-focused.
Instead of using generic or static text, clearly show how much is left until free shipping is unlocked.
Example:
- “You’re €25 away from free shipping.”
- “Only €8 more to unlock free shipping!”
- “🎉 Free shipping unlocked!”
The key is clarity and motivation.
When customers see a specific amount remaining, they’re more likely to add one more product to reach the goal. Even small wording improvements can increase engagement and average order value.
3. Combine with Strategic Cross-Sells
When a customer is close to the threshold, show:
- Low-priced add-ons
- Best sellers under €15
- Frequently bought together products
The free shipping bar creates motivation.
Cross-sells provide the solution.
This is where the real revenue lift happens.
4. Display It Where Decisions Happen
Free shipping bars are most effective when shown:
- In the cart
- In the mini cart
- On product pages
- On category pages (eg. in the sidebar)
Displaying it only on the checkout page is too late and your progress bar won’t have time to work its magic.
The earlier the customer sees progress, the stronger the behavioral impact.
5. Avoid Margin Killers
Free shipping should increase profit, not reduce it.
Make sure:
- The threshold covers your average shipping cost
- Discounts don’t unintentionally lower eligibility
- You monitor AOV changes over time
Free shipping is a growth lever — but only if it’s financially balanced.
When implemented strategically, a free shipping bar becomes more than just a message.
It becomes a behavioral trigger that nudges customers toward higher cart values.
Before wrapping up, let’s address some common questions store owners have about free shipping bars in WooCommerce.
Frequently Asked Questions About Free Shipping Bars in WooCommerce

Does WooCommerce have a built-in free shipping bar?
No. WooCommerce allows you to set free shipping methods and thresholds, but it does not include a built-in dynamic progress bar. If you want customers to see how much more they need to spend to unlock free shipping, you’ll need to implement it with custom code or use a plugin.
Can I set different free shipping thresholds per country?
Yes. WooCommerce supports different shipping zones, which means you can define separate free shipping rules per country or region. A properly configured free shipping bar should detect the active zone and display the correct threshold automatically.
Should coupons count toward the free shipping threshold?
That depends on your pricing strategy. Some stores prefer the threshold to be calculated before discounts, while others apply it after coupons. The key is consistency — your free shipping message must match how WooCommerce calculates eligibility to avoid confusing customers.
Where is the best place to display a free shipping bar?
The cart and mini cart are typically the highest-converting placements because customers are already making purchase decisions there. Product pages can also work well, especially if your goal is to influence cart value early in the journey.
Will a free shipping bar slow down my site?
If implemented properly, it should not noticeably impact performance. Lightweight plugins or optimized custom code that rely on WooCommerce’s cart calculations and AJAX updates are generally safe. Poorly built scripts, however, can create unnecessary reloads or conflicts.
Does a free shipping bar really increase sales?
When configured strategically, yes. The key factor isn’t simply showing the message — it’s setting a realistic threshold and displaying progress dynamically. The psychological effect of “almost qualifying” encourages customers to add one more product instead of abandoning the cart.
Now that you understand how free shipping bars work and how to implement them properly, let’s quickly recap the key takeaways.
🔗 For more insights into free shipping psychology, see our article The Psychology Behind Free Shipping.
Final Thoughts
Adding a free shipping bar to WooCommerce isn’t just about displaying a message — it’s about guiding customer behavior.
When implemented correctly, a dynamic free shipping progress bar can:
- Increase average order value
- Reduce cart abandonment
- Encourage strategic cross-sells
- Turn free shipping into a revenue driver instead of a cost
The technical setup is straightforward. The real impact comes from choosing the right threshold, placing the bar where decisions happen, and ensuring it updates dynamically as the cart changes.
If you want a lightweight, conversion-focused way to implement this in WooCommerce without writing and maintaining custom code, you can try the Free Shipping Label plugin and configure it in just a few minutes.
Free shipping works.
Making it visible and actionable is what makes it profitable.